
The joke (for people like me, who have now been to this varnish workshop multiple times) is that we must be slow learners. But the truth is, I learn something new each time, I add to my knowledge and skill set, and find ways to improve.
Plus there is the company.

For one week I get to be with people who enjoy violin work the way I do, but in a hands-on way. At Violin Society of America (VSA) conventions there are hundreds of like minded people to spend time with, and that's great, but sometimes overwhelming, and somewhat clinical. However, to spend time in a small space with about a dozen people who are all working is amazing and rare. I love it.
The first varnish workshop I attended was in the Boston area several years ago. Then, since it moved to Chicago (which is a commutable distance for me--exhausting by the end of a week, but doable), I've been each year (2016, 2017, 2018). This year was particularly fun because I got to sit next to a maker I met way back during my first experience with a violin making school, and we could share stories and memories that almost no one else understands anymore.
So many nice people. So many beautiful things to see. So much great smelling turpentine in the air! (I'm not being facetious. The stuff we use is excellent and you can even get soap made out of it if you want to smell like you're varnishing violins all the time even when you can't be.)
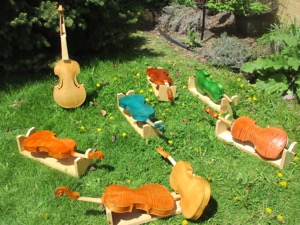
I brought five projects this year. You're only supposed to bring two, but there is a lot of it at this point I don't need help with (slow learner or not), and between being both efficient and somewhat impatient, I get a lot done in the time allowed. I didn't have any of my own work ready to varnish, so I simply bought various instruments in the white to practice with that I'll be able to sell in my store.
 |
| My five things in the sun on the last full day. |
 |
| Shiny! |
So I varnished a factory violin in a manner Joe calls "Four and Out" where after ground, I put down a coat of clear, two coats of intense color, and a last coat of clear. It's not easy controlling color that dark immediately, but it was a fun challenge! I also had a viola that I approached in a similar manner, where I put down color right after the ground. (On the last day I ended up putting on a coat of varnish that was everything left on my bench that I didn't want to waste, and it's pretty nice. Kind of a garbage pail approach to varnish, but it works.)
 |
| Viola going straight to color |
 |
| That red violin? That's only two coats of color. |
Now the wacky projects! I'm sure you noticed the blue violin in a couple of these pictures. There's also a green one that gets a bit camouflaged against the grass.


Every violin person looked at what I was doing with that blue violin and asked "Why?"
 But people come into my store all the time and ask "Why not?" They want to know why I don't make violins in unconventional colors like blue, and I tell them it's because they don't sell. If they sold, everyone would make blue violins. But they don't. And because unusually colored violins don't sell to serious players, most of the ones you run across are cheap and horrible and end up in the hands of players who can't tell the difference.
People often think I'm being a snob when I reject sparkly purple or green instruments that they found online inexpensively, but I don't care much about those aesthetics. I care about function and sound. Most of the time those instruments aren't playable. The setup is terrible, and they are making more work for the player, who is more often than not a beginner, and therefore suffering needlessly with problems they can't even recognize. I get frustrated with any problems that interfere with someone's ability to learn.
So I figured if I went ahead and used very nice oil varnish that happened to be tinted blue, and did good setup on it (decent bridge, nice pegs, etc.), I could have a violin in my shop that I could point to when people ask "Why not?" If it doesn't sell it will prove my point. And if it does? Well heck, I'll make another.
I also made a green violin that I finished setting up recently and is already on sale in my store. This one, however, is incredibly cheap. It's the least expensive instrument I offer at the moment, but it works far better than most things you can get for the same price or similar online. I have no idea if the cheap green violin will find an owner or not, but who knows what Packers fan could be inspired?


In any case, learning to control the evenness of an intense color was a great challenge. It's hard enough in the realm of red and orange and brown. Green and blue? Much harder to keep even and consistent, so I'm sure the tricks I learned while doing that will help with my normal varnishing.
 The weird mystery of the workshop was that when I went to strip the blue violin (to correct my first attempts to make it blue on my own and it went off the rails), parts of it burned. There are burned spots all over that violin, from the spruce to the ribs to the back to the purfling. No one in the workshop had ever seen something like that happen with what we were using. (I used Citristrip and did not leave it on very long.) Thankfully, the intense color masks or distracts from those spots and they don't matter, but I wasn't able to use my normal grounding agents because they oxidize the wood, and more oxidation was the last thing we wanted to encourage.

 There was more rain than was helpful at this year's workshop, but more bagels (Thanks, Tommy!). There were helpful lessons and advice from Todd Goldenberg and Dorian Barnes. There was even an adorable shop dog on a couple of days!
I learned some of the most interesting lessons from the incomparable Marilyn Wallin. She continues to inspire me more than I can say.
Thanks for the wonderful workshop, Joe. (And seriously, the texture of the new Greek Pitch Brown is much appreciated!) Already looking forward to next year.

No comments:
Post a Comment