


On the one hand, that was great because it was incredibly convenient. For nearly all of it I commuted home at night, which meant I was able to still attend an evening orchestra rehearsal, I could check in with the kids in person, and sleep in my own bed. On the other hand, driving back and forth to Chicago every day was exhausting, and there is something to packing up and leaving town and not being distracted by your normal everyday life while trying to immerse yourself in another experience. Overall, though, it was great to have the workshop so comparatively close.
 The workshop was held at the Chicago School of Violin Making. I have several friends who got their training there, and my own teacher taught at CSVM for years before moving to Wisconsin which is where he took me on as a student. I enjoyed having a chance to work in that space for a week and get a feel for what that environment is like.
The workshop was led again by Joe Robson, who is a varnish maker, and luthiers Marilyn Wallin and Todd Goldenburg. The dozen or so of us in attendance spanned the range from people oil varnishing for the first time to accomplished builders. It was a really pleasant and interesting group.

For people who may not understand the complexity of violin varnish, you should know it's generally considered half the process of building a violin. I get asked once in a while why we even need varnish on a violin, and there are several reasons, not the least of which is for protection. Violins are objects that are handled regularly, and the amount of damage the oil and dirt from our hands can cause is extensive. Varnish helps protect the wood from injury. Varnish on a violin has a great impact on its sound. Violins set up "in the white" (meaning without varnish yet) invariably sound more "screamy" to me, less settled, slightly hollow and less focused.
All of these are important elements of varnishing a violin, but I would say the goals of the workshop were centered on beauty. Varnishing a violin simply makes it beautiful, and there is a huge range of ways to pursue that goal. Application technique is everything, along with developing your eye and learning to understand the materials. It takes a lot of practice, and a lot like playing a violin, even as we improve we will never get as good as we'd like to be.

For the workshop we were supposed to bring two instruments: One in the white, and one with the ground completed already. (More on what "ground" is in a moment.) I was ambitious and wound up bringing three violins. Two of them I purchased in the white from a supplier Joe recommended (which is what I did last time as well), and one of them was the violin I've been working on on commission. The player for that instrument liked the look in photos of the varnish on Marilyn's most recent instruments, so I wasn't going to pass up the opportunity to have her advise me in person on how to reach that color.
Ground. Ground is everything you put into the wood that becomes a part of it, and varnish is everything you put on top of that. Ground involves the underlying color you are working with, and a certain amount of sealing and preparing the wood for varnish. The mantra of the workshop boiled down to: "The illuminating power of ground is stronger than the tinting power of varnish." What that means is as much as we are distracted by color on the surface of an instrument, much of its impact is due to how well light is reflecting back to our eye from the wood beneath it. Really beautiful violins aren't just a nice color; they glow. (There are other philosophies, by the way. We were focused on Cremonese varnish. There are other regions of Italy and elsewhere where more pigmented varnishes were used which have a flatter, darker look, and those are beautiful too. Just not what most people go for.)
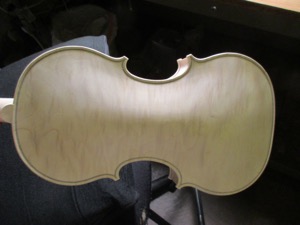
Here is my violin in the white:

And here is my violin after I completed the ground:
(This color is now a permanent part of the violin. You can strip varnish, but you can't strip ground.)


If you have the time and the weather for it, tanning an instrument in the sun creates an excellent ground color. There are methods of sealing instruments using egg whites or thinned varnish or shellac. People artificially age wood by using ammonia or other chemical solutions, or color it with everything from tea to watercolors to wood stains. They all produce different results. I used the Balsam Ground system that Joe developed because I think it's healthier for the wood in the long run and I simply like the look. But one of the things I appreciate about this workshop is that Joe, Marilyn, and Todd all have very different approaches, and you can use any ground or varnish you want. They'll find a way to guide you while allowing you your own vision. (That kind of nonjudgmental instruction is relatively rare in my experience.)
My goals for the other two violins were to make one in the light amber range (because I have never left an instrument that pale and wanted to try it), and one to emulate the color of the Amati violin I saw at the National Music Museum in South Dakota last summer. The Amati has this intriguing quality where the color shifts in the light in unusual ways. All violins look different colors in different light, but this instrument could change in the same light. (In any light it was beautiful.)
 |
| Me and the Amati at the NMM, May 2015 |
I need to share pictures of what Josh brought to varnish because it makes me smile every damn time. He built a pochette. A second pochette, actually. (It's essentially a travel violin--this one is a copy of one built by Stradivari.) It is so weird looking and cute, and it makes you simultaneously ask "Why?" and "Why not?" I love it. It was really quick to varnish, so with limited time I suppose that was a plus.

 |
| Joshua Beyer and his pochette |


 |
| sunbathing violins |
 |
| My three violins in the sun |
 The hardest parts to get to dry in the sun are the ribs on both ends, so it helped to make sure those areas got direct sunlight, too.
At night, or when the weather didn't cooperate, we dried our instruments in UV light boxes made from garbage cans.

The best thing about the workshop is the chance to try new things and get feedback, as well as watch what other people are doing. I used colors I've never thought to try before in ways that wouldn't have occurred to me on my own. Some of the materials I was used to had updated instructions which was good to know. I had expected to apply varnish on one of my instruments directly with my hands like I had a chance to do the last time, but I always automatically reached for a brush, so I just gave in and declared myself a brush person. (It's less sticky that way, anyway.)

In addition to varnishing, there were various demonstrations (including a particularly informative one by Marilyn on antiquing), occasional doughnuts, and a day of marveling over more than half a dozen rare instruments on loan from a local dealer.
 |
| Marilyn Wallin |
 |
| turpentine bunny! plastic shot glass worked fine for alcohol, but the turp ate right through that. |
The most useful tip I came away with is probably to leave the fingerboard on when varnishing so you don't have to try and re-situate it later. One of my least favorite steps in violin making is going to all the trouble of putting the fingerboard on right, only to take it off for varnishing and then struggling to get it back on in exactly the same way later. Not necessary, apparently. It's possible to simply reach under the board with your brush, and if it's not perfect nobody will see it anyway. The only trick is to remember to cover the board with reflective foil so that it doesn't absorb heat in the sun and end up cracking. But from now on I'm permanently gluing the fingerboard on the first time around and leaving it there.
An added fun thing for me was that my mom had an appointment of her own in Chicago at the end of my week, so for my last two nights of the workshop I stayed with her in a hotel. She had dreams of taking me out for a lovely belated birthday dinner, but we had to settle for Ruby Tuesday's because it was within walking distance, and after all of that commuting I just didn't want to get back into a car if I didn't have to. I like that my mom got a chance to meet my varnish friends. She even came to the pizza party the last night and drank wine from my newly purchased CSVM mug.
 |
| Me and my Mama |
 |
| My violin to color |
Which, in the end, is the purpose of the workshop: To leave you inspired and excited about violins and varnishing. Too often the varnishing process makes people anxious rather than joyful, but it really is fun. All you need is a little knowledge, practice, and confidence, and I got all three that week.
The whole event went by too quickly. I miss being able to dedicate full days to doing the work I enjoy most. I miss having colleagues around for what is usually a process set in isolation. I miss the daily smell of turpentine.

The pochette is new - I didn't know about that. I wonder if each cello has one too?
ReplyDeleteIsn't it adorable? I was (half) joking with Josh that he/we should enter a whole "pochette quartet" at the VSA competition. It would certainly be memorable!
DeleteI have seen a cello that was designed for a WWI soldier that essentially folded in half. You could open it up and fold the neck into the body of the instrument, and the body was just a narrow rectangular box. It didn't sound very good, but it would at least allow you to practice fingerings, etc. The pochette--as small as it looks, actually has the same string length and spacing as a normal violin, so you could safely practice your technique even if you aren't creating a big sound.
Never seen so pretty a violin. Will be in area week before Memorial Day. Possible to be there for set up? You can still keep for Cleveland.
ReplyDeleteEmail me closer to that time and I'll let you know what's up. I hope to at least have the board on by then, and the final coat polished out. I feel as if all I've been doing is rehairs since I got back, but I need to make time for my own work soon. It would be fun to lay out all the fitting options against the finished color and see what you think!
Delete