I haven't done a lutherie update in a while. Mostly because
I have been distracted from my work of late. Not so much from my work at the store, but my own building. I was warned many years ago by another builder that once you open the door to doing repairs it becomes almost impossible to find time to build, and he was right. As much as I appreciate the work when it comes to paying the bills, most of the time I wish people would simply take better care of their equipment and leave me more time to myself.
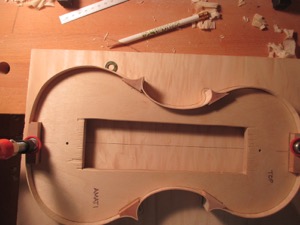
For instance, I worked on straightening this cello bridge this weekend:
For those who don't know what they should be seeing, the square I set on that cello top shows where the back of that bridge should be lining up. When the top of a bridge starts to pull forward (usually from tightening the strings) and it's allowed to lean for an extended period of time, the pressure of the strings warps the wood. Most of the time it can be steamed out and pressed flat again, but the bridge is left weaker and more vulnerable to warping in the future, so better not to let it get warped to begin with. In any case, I'm amazed this particular bridge didn't snap.
I'm glad I can do repair work for people and keep their instruments running well, but after not getting much done this summer on the violin I'm supposed to be building (not to mention the one
I'm supposed to be helping Aden build) I've decided this week to buckle down and get back to work. So here's a run down for those who are interested in how my current violin is progressing.
First, the scroll. Probably of all the parts of a violin the thing I get the most comments on would be the scroll. I would say I get the most "questions" about it, except that the only real question ever is "How do you do that?" And there isn't a very satisfying answer, other than to say you carve away all the wood that isn't part of the scroll and then there it is.
Carving a scroll is fun, though. It takes a lot of practice and skill to execute all those curves correctly, and the symmetry is tricky, but the scroll is easily the most sculptural part of making a violin so there is a relative element of freedom to it. It's definitely the most portable part of the work. I actually took my scroll and tool bag with me over spring break and worked on a bit of carving
in Ohio and New York.
You start by planing a scroll blank (a block of maple) flat, smooth, square, and to a particular thickness, then tracing on the template.

I cut the rough shape out on a band saw and used a drill press to lay out the pilot holes for the pegs, but the rest of it is all done with hand tools. I have about a dozen gouges and a few different chisels specifically for scroll carving. I also use a knife, Japanese saw, finger planes, files, and scrapers for various steps. I do some layout lines, make relief cuts, and then most of it is really just carving away and looking carefully.


Since it's an Amati model I used some of my photos of the Amati
violin I liked so much at the
National Music Museum as a reference. I
know to the average person all scrolls look pretty much the same, but
they really aren't, and Amati scrolls are my favorite. There is a charm
and a perfection to them that I will be chasing for the rest
of my life.
The only frustrating part for me is the inside of the pegbox. That is
just never fun, but at least I feel like I'm getting better at it. You
have to be careful not to make the floor or the walls of the pegbox too
thin, but you want as much room in there as possible. It's just not an
easy space to work in, and you go to a lot of trouble to make it clean
and nice and no player will ever notice it. It's one of those parts of
the instrument where you put in the extra effort for your own sense of
pride and to meet the approval of some future repair person who may have
to deal with what you've created one day. But no player has ever said,
"Ooh, the inside of my pegbox looks so good!" because it's all obscured
by pegs and strings and, just, no.
But it's done! And the scroll is now awaiting a fingerboard and nut and heel planing and neck shaping for when the body is done and I can set the neck.
The body, in the meantime, is where I have been a bit stalled. I'm amazed every time I build an instrument how certain steps feel like an endpoint and are actually a precursor to many time consuming steps. I've mentioned before how it always feels as if after gluing the ribs to the blocks that the rib assembly is done, but then there is planing and linings and shaping and more planing and the !@#$ corners to do. I always feel on the body that once I've glued in the purfling that I'm really rolling, but then things slow down again with having to shape the channel and blend the arching, and that's what I've been struggling with lately. That work is best done in the dark under a raking light because you need shadows to see those shapes properly, and I've had trouble finding nights to work.
Let me back up though. Plates: The top (front) of the instrument is made of spruce. That wood is quarter-sawn and book-matched. (Imagine cutting a wedge out of upright log like you are cutting a slice of pie, then splitting that wedge in half and opening it up like a book to make the left and right sides of the plate.) Here is my spruce right after I glued the center joint:
For the back of this violin the player selected a single piece of quilted maple. It's a gorgeous piece of wood, and it was very thick to start, so I used a planer to rough it down to a more workable thickness, and then finished smoothing it with hand planes.
Once the boards for the plates were flat and smooth and the rib assembly was done, I traced the ribs onto the boards, and used a washer to help create an outline 4mm around the ribs. I used a bandsaw to cut out the rough shape of the plates, and that's the last time I'll use a power tool on this instrument. The rest is all hand tools.
There is rough gouging, edge thicknessing, more gouging, then shaping the arching (the curved shape on the top and back of the instrument) with finger planes and eventually scrapers.
(Check out how interesting the light looks through some of the thinned areas on the flamed maple:)
Once the basic arching is finished on the outsides of the plates, you rough graduate the insides. (Finished graduations come later, but removing some of that material at this stage makes the plates lighter and easier to work with.)
After the plates have been rough graduated they are temporarily glued to the ribs and you can finish the margins (the overhang of the edges of the plates) which creates the finished outline. At that point you can install the purfling.
Purfling is what makes the pair of black lines that run along the
edges of the top and back plates. Many people think those lines are
painted on, but in most cases they are actually an inlay. Purfling helps protect the
instrument from injury (stopping a lot of damage on the edges from
running disastrously farther into the plates)
You use a tool called a purfling marker to scribe the lines of where the purfling will go, then cut those deeper and clear out the wood from that channel and fit the inlay.
I glued my purfling in place back in July and just recently started the work of carving the channel along the edge and blending the area from the purfling back up into the arching. That's the work I was describing earlier as being better done in the dark. Tipping the plate to create shadows allows you to see all the curves and know where to make adjustments.
The bulk of the arching work is done before the purfling goes in, but there is a lot of blending work to do after trimming down the purfling and shaping the channel. The rough work is done with finger planes, and then cleaned up again with scrapers.
I should have the arching and channel all cleaned up in the next day or so, and then I get to move on to graduating the plates! That part is always fascinating and I'm looking forward to it.
So that's the update. I am way behind where I expected to be by now,
but life is complicated. I'm glad I get to do such fulfilling work whenever I'm lucky enough to get to do it. The goal now is to actively make more time for that to happen. Because there are violins I need to make, regardless of excuses! It's good to be getting back to work.


 I cut the rough shape out on a band saw and used a drill press to lay out the pilot holes for the pegs, but the rest of it is all done with hand tools. I have about a dozen gouges and a few different chisels specifically for scroll carving. I also use a knife, Japanese saw, finger planes, files, and scrapers for various steps. I do some layout lines, make relief cuts, and then most of it is really just carving away and looking carefully.

 Since it's an Amati model I used some of my photos of the Amati
violin I liked so much at the National Music Museum as a reference. I
know to the average person all scrolls look pretty much the same, but
they really aren't, and Amati scrolls are my favorite. There is a charm
and a perfection to them that I will be chasing for the rest
of my life.
Since it's an Amati model I used some of my photos of the Amati
violin I liked so much at the National Music Museum as a reference. I
know to the average person all scrolls look pretty much the same, but
they really aren't, and Amati scrolls are my favorite. There is a charm
and a perfection to them that I will be chasing for the rest
of my life.


Love the scroll! Very exciting!
ReplyDeleteAnd I'll make sure to note the peg box when I changing strings.
ReplyDeleteIt's a kick-ass pegbox--you'll love it. Tonight I'm laying out the f-holes!
DeleteThis is so fascinating! Thank you for taking the time to show step-by-step your process and explain the challenges and difficulties. I'd never have given the pegbox another thought until you talked about it. It truly is a work of art. :o)
ReplyDeleteP.S. I think you look like your dad in the planing photo. :o)
I love what I do! Even the annoying bits.
DeleteAnd thank you, except my dad probably never held a plane in his life, so the resemblance takes a little imagination for me!
I love, love, love your violin posts!! I feel like I've learned so much about something I initially knew nothing about. Thank you so much for sharing your passion and art.
ReplyDelete